Creepy & Delicious: Craft Realistic Witch Finger Cookies for Halloween
Halloween is a time for embracing the delightfully macabre, and what better way to celebrate than with treats that are both gruesome to behold and heavenly to devour? Enter the world of
witch finger cookies – a quintessential Halloween dessert that consistently earns gasps of admiration and delight. These aren't just any spooky snacks; they are a masterful blend of chilling aesthetics and gourmet flavor, making them the ultimate showstopper for any festive gathering. Imagine a plate of seemingly severed fingers, complete with realistic knuckles, jagged nails, and a hint of ghastly "blood" – yet each bite reveals a tender, buttery shortbread cookie that’s absolutely irresistible.
Forget the days of settling for merely cute Halloween cookies. This year, it’s time to go all out and craft truly realistic witch finger cookies that will elevate your spooky season celebrations. They're surprisingly simple to make, incredibly fun to decorate, and guaranteed to be the talk of your Halloween party, proving that sometimes, the creepiest treats are also the most delicious.
The Allure of Witch Finger Cookies: A Halloween Tradition Reimagined
What makes
witch finger cookies such an enduring Halloween favorite? It’s the perfect paradox they embody: a terrifying appearance masking an utterly delectable taste. Unlike many novelty Halloween treats that prioritize looks over flavor, these cookies break the mold. Beneath their eerie exterior lies a rich, buttery shortbread, often with a subtle hint of almond, that’s so good it could stand alone. This combination ensures that your guests are not only entertained by their gruesome display but also thoroughly satisfied by their gourmet quality.
Whether you're hosting a bash for little goblins or a sophisticated soirée for adult monsters, these cookies are a versatile and much-loved addition to any Halloween menu. They spark conversation, elicit playful shrieks, and perfectly capture the spirit of a holiday dedicated to all things spooky and fun. Display them creatively – perhaps standing upright in a "potion" cauldron or fanned out on a platter like a collection of mystical artifacts – and watch them become the undisputed centerpiece of your treat table. For even more fantastic ideas on making these a staple, check out
Why Witch Finger Cookies Are Your Go-To Spooky Halloween Dessert.
Mastering the Art of Realistic Witch Finger Cookies
Crafting the perfect batch of
witch finger cookies is all about paying attention to the details. The real magic happens when you transform simple cookie dough into something truly uncanny.
The Perfect Base: A Buttery Shortbread Dream
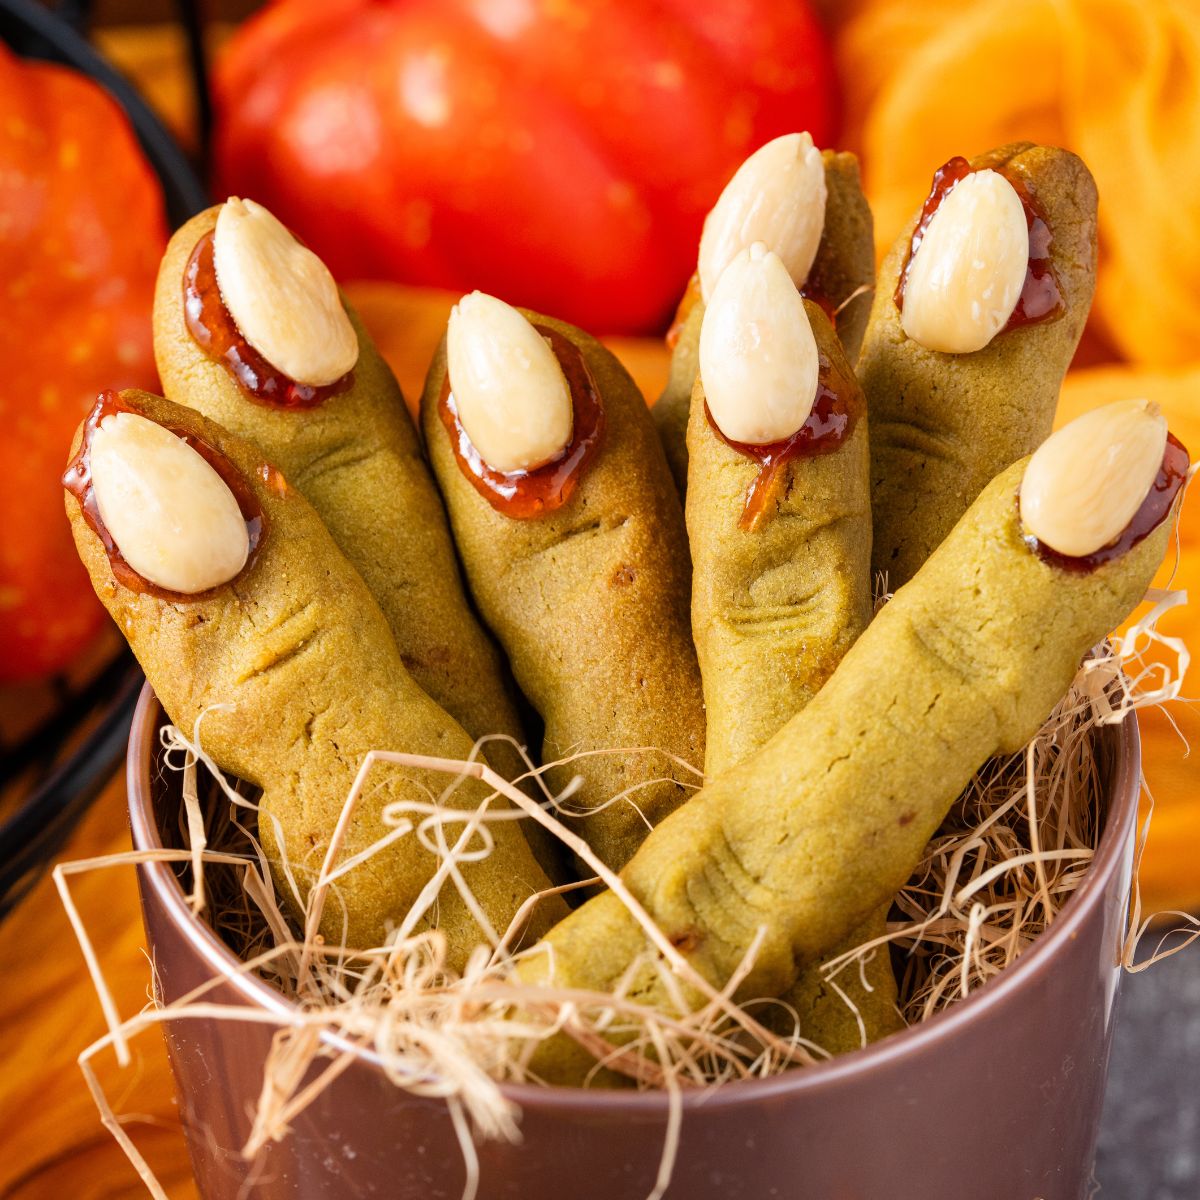
The foundation of any great witch finger cookie is an outstanding dough. We're talking about a classic shortbread – tender, crumbly, and wonderfully buttery. The addition of a touch of almond extract is crucial here, not only for flavor but also to complement the almond "nails." For that iconic witchy look, you might consider incorporating a few drops of green food coloring gel into the dough, creating an even more authentic "skin" tone. This ensures that while the cookies look spooky, they taste nothing short of amazing. The goal is a dough that holds its shape well during baking, allowing your carefully crafted "fingers" to maintain their gruesome integrity.
Crafting the Creepy Details: Knuckles, Nails, and Gashes
This is where your inner artist comes out! Shaping the dough is key to realism.
- The Knuckle: After rolling a portion of dough into a finger-like shape, gently squeeze the center to create a subtle indentation. This is your knuckle. You can use the side of your thumb or a blunt knife edge for a more defined, bony appearance. Don't press too hard, as the dough will expand slightly during baking.
- The Nail: This is arguably the most impactful detail. For truly realistic nails, you absolutely need blanched almonds. Their smooth, pale surface perfectly mimics a fingernail. While you can sometimes find blanched almonds in specialty stores, they can be pricey or hard to locate. But fear not, blanching almonds at home is surprisingly easy:
- Bring a small pot of water to a boil.
- Add raw, unshelled almonds to the boiling water and let them simmer for about 1 minute.
- Immediately drain the almonds and rinse them under cold water to stop the cooking process.
- Pinch each almond at the broad end, and the blanched kernel should slip right out of its skin.
- Pat them dry completely before use.
Once blanched, firmly press an almond onto one end of each "finger" to create the nail bed.
- The Gashes & Wrinkles: This step is often overlooked but dramatically enhances realism. Using a small, sharp knife, make several shallow slashes or lines underneath the almond nail and across the knuckle area. These aren't deep cuts; think of them as replicating the natural wrinkles and creases of a finger. The beauty of doing this before baking is that these slashes will "set" in place, giving your cookies a truly grotesque and authentic texture that holds up through the heat.
The Ghoulish Finish: "Bloody" Red Gel
No witch finger cookie is complete without a touch of gruesome "blood." Once your cookies are baked and cooled, carefully dab a small amount of red food coloring gel or icing gel right under the almond "nail." This final touch adds a shocking splash of gore, transforming your delicious treats into genuinely creepy severed digits. The contrast of the vibrant red against the pale (or green) cookie is what truly brings the illusion to life. Be sure to let the red gel set completely before handling or storing the cookies to avoid smudging.
Displaying Your Macabre Masterpieces
Presentation is paramount for
witch finger cookies. Their visual impact is half the fun! Don’t just pile them on a plate; get creative with your display.
- Upright and Ready: Line a tall, narrow container or even a clean, empty "potion" bottle with parchment paper and arrange the cookies so they stand upright. This creates an unsettling visual of fingers reaching out, ready to be grabbed.
- Spoke Fashion: Arrange them on a large platter with the "fingernails" facing outwards, creating a macabre sunburst effect. This makes them easily accessible and allows each detailed cookie to be admired.
- Graveyard Scene: Crumble some chocolate cookies or chocolate cake around the base of your platter to simulate dirt, then have the witch fingers "emerge" from the soil. Add a few gummy worms for extra creepiness.
- Cauldron of Treats: If you have a decorative cauldron, line it and fill it with your witch finger cookies, perhaps with some dry ice for a smoking, mysterious effect (ensure it's safe and doesn't directly touch the food).
For more tips on how to make these a breeze for your party, check out our guide:
Easy Witch Finger Cookies: The Ultimate Halloween Party Treat.
Practical Tips for Baking and Storage
To ensure your
witch finger cookies turn out perfectly every time, keep these practical tips in mind:
- Dough Consistency: If your dough is too soft and sticky, chill it in the refrigerator for 30 minutes to an hour. This makes it much easier to roll and shape.
- Even Baking: Bake cookies on parchment-lined baking sheets to prevent sticking and ensure even browning.
- Cooling is Crucial: Always transfer baked cookies to a wire rack to cool completely. This helps them crisp up and prevents them from becoming soggy. Crucially, allow the red gel to fully set (which can take a few hours) before stacking or storing.
- Storage: Store your finished witch finger cookies in an airtight container at room temperature for up to a week. They maintain their delicious flavor and eerie appearance wonderfully. For longer storage, they can also be frozen before decorating with the red gel.
- Batch Size: A good recipe typically yields around 50-60 cookies, making them perfect for large parties or for sharing with all your ghoul-friends.
Conclusion
This Halloween, don't just bake; create an experience.
Witch finger cookies offer the unique opportunity to combine culinary skill with playful horror, resulting in a treat that is both visually shocking and utterly delightful. From their buttery shortbread base to the intricate details of their "knuckles" and "nails," every element contributes to a truly unforgettable Halloween dessert. So, roll up your sleeves, embrace the creepy, and get ready to craft a batch of these iconic cookies that will have everyone reaching for another "finger" – if they're brave enough! Happy haunting, and happy baking!